 mail
mailmailniño help
Step-by-step guides. If something is missing, write to us — this page grows from what people ask.
Installing
- Download the installer from the main page.
- Run it. The installer is digitally signed, so Windows shows the publisher's name (Michal Foist). A freshly released file may still get a blue SmartScreen box — click More info and then Run anyway; that is about the file being new, not about what is in it.
- mailniño starts by itself and asks for your first account.
Updating: just run a newer installer over the existing one. Accounts and downloaded mail stay; there is nothing to uninstall.
There’s an MSI for admins and companies too (it installs for all users of the computer): on the home page, under the download button, there’s an Or: Download MSI link, and its checksum is in the verification section.
Installing on Linux
From version 1.3 mailniño is also on Linux. The home page has a Download for Linux button (the .deb package) with a link to the AppImage below it.
- Ubuntu, Debian, Mint (.deb): from a terminal, in the folder with the
downloaded file, run
sudo apt install ./mailnino_*_amd64.deb. Text-from-scan reading (Tesseract) is installed alongside mailniño. - Other distributions (AppImage): make the file executable
(
chmod +x mailnino_*_amd64.AppImage) and run it. On Ubuntu it needs thelibfuse2t64package. - Passwords are stored in the system keyring (GNOME Keyring or KWallet). If the keyring isn't running, mailniño says so and doesn't save the password.
- Updates: the app offers a new version on its own. The AppImage swaps itself out; the .deb package installs once you type the admin password.
- Settings from Windows transfer over as a file — see Move to another computer.
Updates
From version 1.1.0 mailniño can update itself — entirely on its own and safely: it checks, downloads, verifies the signature, installs and restarts. Your accounts and mail are untouched.
You choose how it behaves in Settings → About, under “When a new version is out”. You can switch any time:
- Just tell me — it lets you know and offers a link. You start the install.
- Ask, then install — the default. It asks, and if you say yes, it downloads and installs.
- Install on its own — downloads and installs without asking, and only lets you know.
⛔ The default deliberately is not “on its own”. An install you never heard about is exactly what plenty of people do not want from an app on their computer. If you want quiet, switch it — and switching back is just as easy.
What leaves your computer: only the version number and a random installation number, so we can tell on how many computers mailniño runs. Nothing about you, nothing from your mailbox. How often it asks is the setting right above; on Manually it never asks on its own.
Why it is safe: the downloaded package is signed and mailniño checks the signature before running it. A package without a valid signature is not installed.
In a company (MSI): mailniño also ships as an MSI for rolling out to a whole
machine. There self-update is not offered — it installs into
Program Files, so every update would need administrator rights. A new version is
rolled out by whoever installed the app — but mailniño still announces it and offers
the new MSI to download.
Adding an account
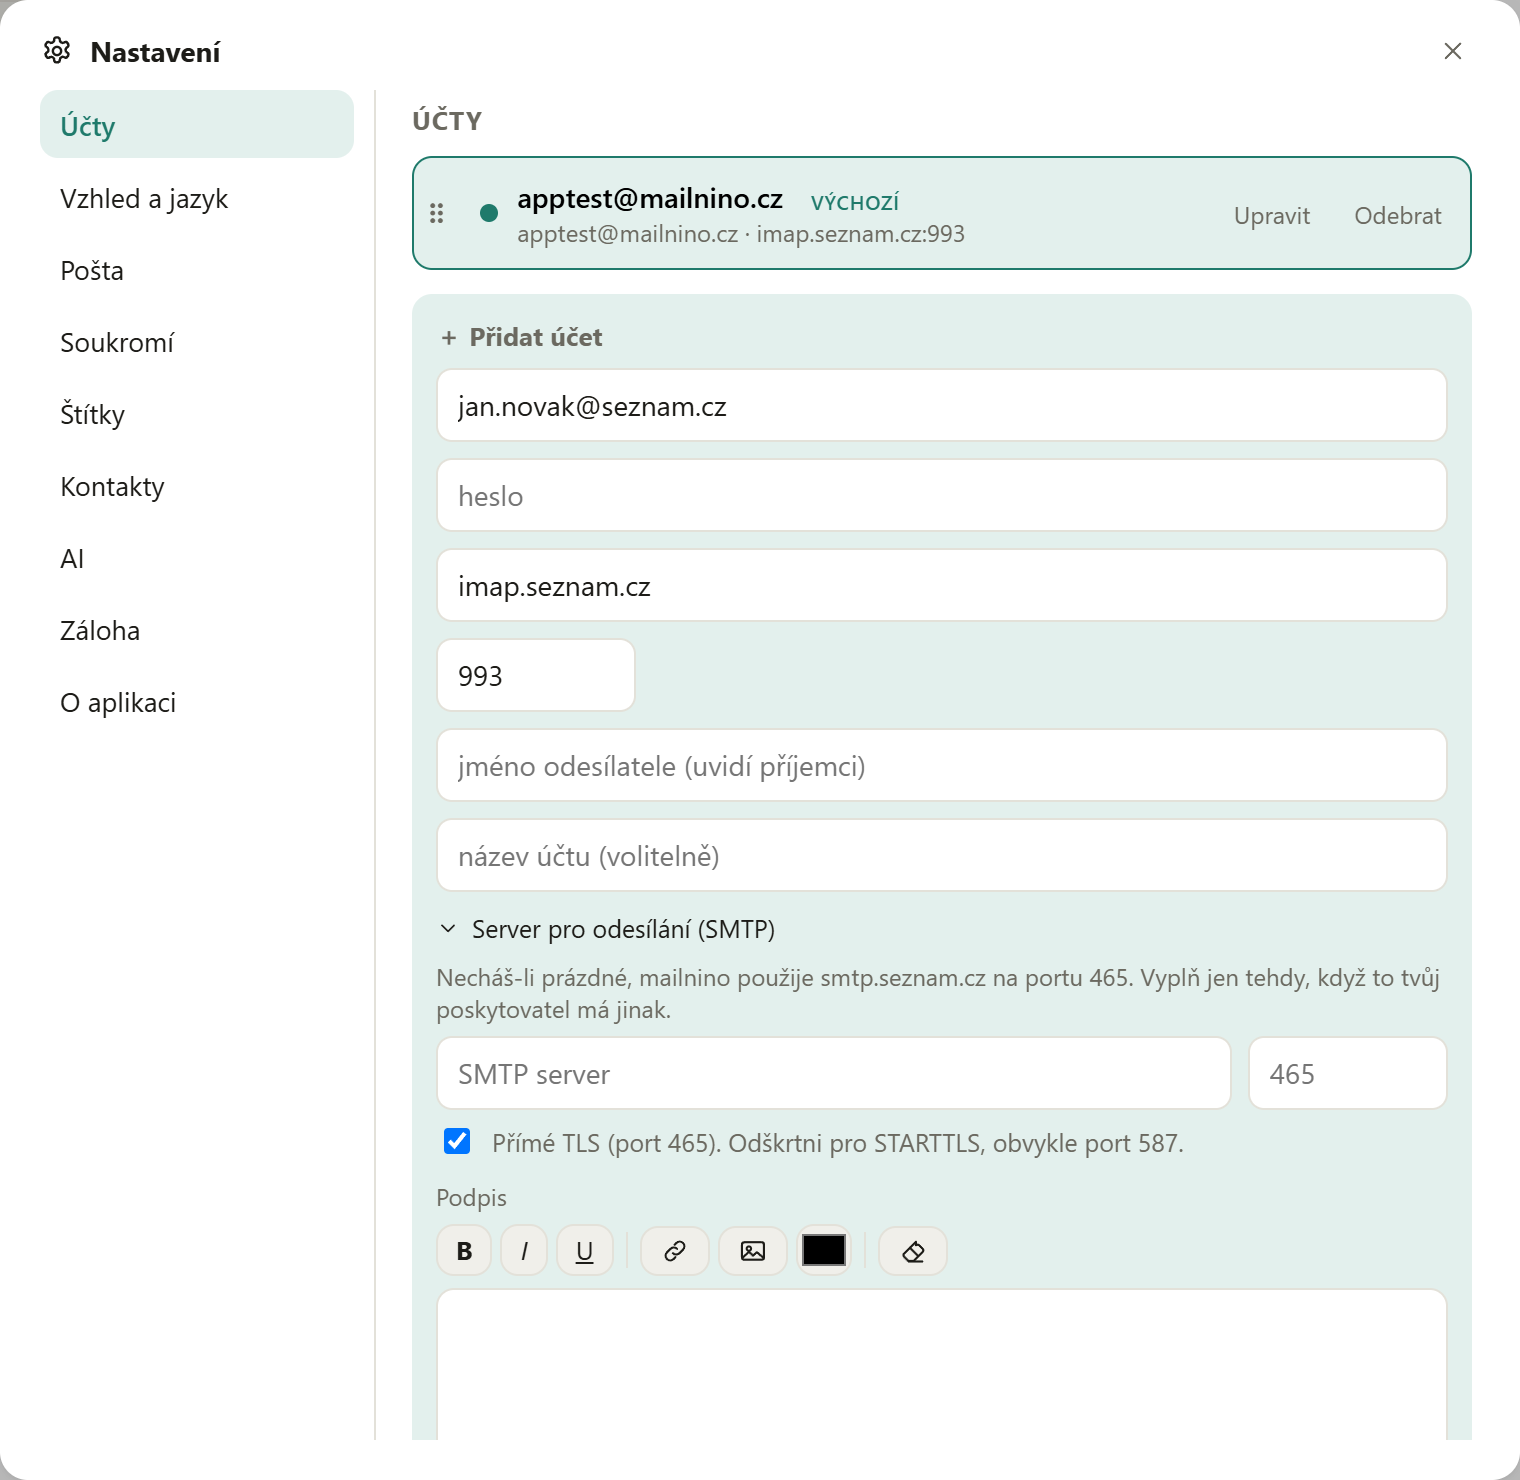
mailniño works with any server that speaks IMAP (receiving) and SMTP (sending). You need four things: your address, your password, the incoming server and the outgoing server.
- Open Settings (the gear, top right) → Accounts.
- Click Add account.
- Fill in the address and password. mailniño tries to work the server out from the domain — for well-known providers it fills it in for you.
- If the guess is wrong, open Outgoing server (SMTP) and set it by hand.
- Click Save. The app connects straight away and tells you how it went.
For mail at Microsoft (Outlook.com, Live, Hotmail and Microsoft 365 work or school accounts) use the Sign in with Microsoft button at the bottom of the form. You sign in in your browser, the address and servers fill in by themselves and no password is entered — Microsoft no longer allows passwords for mail. At work and school the admin has to allow IMAP and authenticated SMTP.
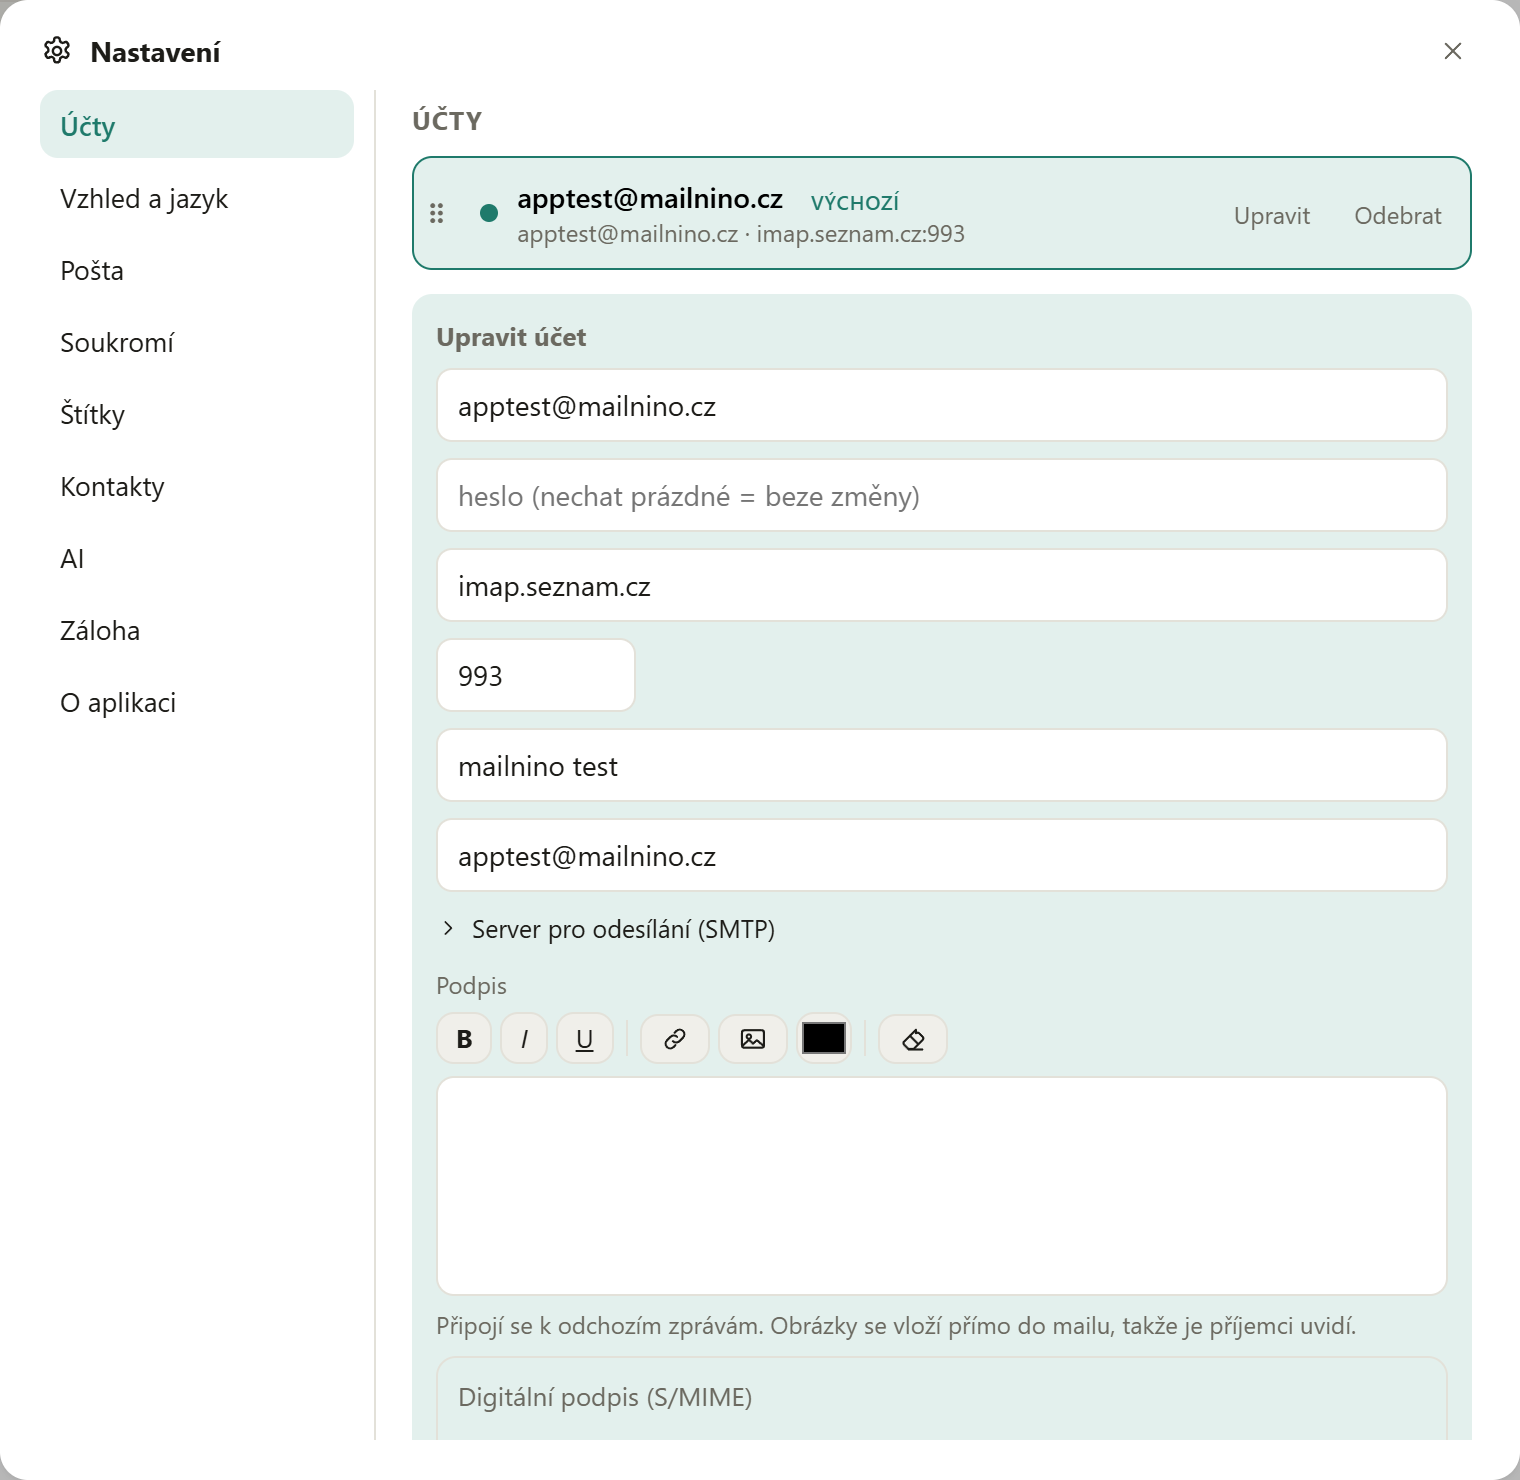
Seznam.cz step by step
Seznam needs no special setup — the address and password are enough. If you ever want to type the values yourself, these are they:
| Setting | Value |
|---|---|
| Incoming server (IMAP) | imap.seznam.cz |
| Incoming port | 993, encrypted (SSL/TLS) |
| Outgoing server (SMTP) | smtp.seznam.cz |
| Outgoing port | 465, encrypted (SSL/TLS) |
| Username | your full e-mail address |
Own domain hosted at Seznam? Then the username is your full address
(you@yourdomain.com), but the servers stay imap.seznam.cz
and smtp.seznam.cz — not imap.yourdomain.com. That name has
no matching certificate, and mailniño refuses to connect to it for safety.
Switching language
mailniño speaks English, Czech, Slovak, Spanish, Ukrainian and German. On first run it picks the language from Windows; if it recognises none of them, it stays in English.
- Open Settings → Look & language.
- Click a language. The change is immediate — nothing restarts.
The installer speaks the same six languages and also follows the system.
Czech data boxes offer themselves in Czech, Slovak and Ukrainian. It is a Czech state service — and anyone using mailniño in Slovak or Ukrainian most likely lives in Czechia, so they may well have a box. In English, Spanish and German they do not show up; anyone who needs them there switches them on in Settings → Accounts — from that moment the language no longer decides.
Font size
In Settings → Look & language you pick 100 %, 125 % or 150 %. It enlarges the whole window — text, buttons and spacing alike. A size that wouldn't fit your screen simply isn't offered.
Gmail and Microsoft 365
Gmail will not accept your ordinary password. You need an app password:
- Turn on two-step verification in your Google account (without it, app passwords are not offered).
- Create an app password and use that in mailniño instead of your normal one.
- Check that IMAP is enabled in Gmail settings.
Connect a Microsoft account with the “Sign in with Microsoft” button at the bottom of the form — Outlook.com, Live and work or school accounts. No password — you sign in with Microsoft directly.
Search
The search box sits above the message list. Searching happens on your own computer, so results appear instantly and work without an internet connection.
- Searches the sender, subject and message text.
- Since 1.0.6 it also searches inside attachments — see below.
- Accents are ignored — “uctenka” finds “účtenka”.
- The start of a word is enough — “invo” finds “invoice”.
- In an ordinary folder it searches that folder only. In the unified inbox it searches across accounts.
After installing, mailniño spends a while processing messages in the background — there is a thin progress bar at the bottom right. You can carry on working.
As soon as you start searching, two menus appear under the field:
- Where to search — This folder · Whole account (each account separately) · All accounts. It always starts at the folder you have open and returns there for the next search, so you never search your whole mailbox without knowing it. A hit from another folder says where it came from.
- When it arrived — Any time, Last 7 / 30 days, Last 3 / 6 / 12 months, Last year, or Pick a range (from–to) with a date picker. It goes by when the message reached you, not by the date the sender wrote into it — that one is often made up in spam.
Searching inside attachments
A PDF invoice, a Word contract, an Excel sheet — you find them by what is inside them. Type a reference number or a company name from the invoice and the message shows up, even though that word appears nowhere in the e-mail itself.
Such a hit has a lit paperclip in the list, so it is obvious straight away why that message turned up.
- What is read: PDF, Word (.docx), Excel (.xlsx), PowerPoint (.pptx), LibreOffice (.odt, .ods, .odp), plain text and tables (.txt, .csv).
- What is not: images and scans (the text in them is for the eye only), videos and archives, anything over 10 MB, and the old .doc and .xls.
- Attachment names are always searchable, and in parts:
Invoice_2026-08_Acme.pdfis found by “invoice”, “acme” and “2026”.
You can switch it off in Settings → Mail → “Search inside attachments too” (on by default). It is the only part of indexing that downloads extra data, so on a metered connection turning it off makes sense. Switch it back on and mailniño returns to your older mail as well.
Attachments are read after message texts and in the background, so on a large mailbox it takes a while to go through everything.
Text from a scan (OCR)
A scanned invoice or a photo of a receipt is just an image to a computer — nobody can find the text in it. mailniño can read it out: on an attachment (PDF or image) click “Extract text”.
- Only on request. Nothing is read in the background — it is work with the content of your mail, and that should not happen behind your back.
- The text appears page by page as it is read.
- Ten pages at a time. For a longer document you are then offered Read 10 more — nothing is refused.
- What is read stays. It is not read again, and above all the message becomes findable by what is on the scan — search for the amount or the account number from the invoice.
- The layout stays recognisable — what was below something on paper is below it here too. Table columns will not be aligned, though.
When nothing is found
An empty result doesn't mean there is no text in the image — usually it is simply too small compared to the whole photo. mailniño retries the image scaled down on its own, and when even that isn't enough, these three things fix it:
- Crop the image down to the part with the text. This matters most: in a 4000-pixel-wide photo of a screen a single line of text wasn't read at all, while the same line cropped on its own was read in full — and fifteen times faster.
- Shoot close up, straight on and in focus. What is blurred or skewed for the eye won't be read by the computer either.
- A scan or a screenshot beats a photo of a screen. A photographed display adds reflections and fine banding that spoil the reading.
It reads in the languages you have in Windows. Nothing is downloaded, reading is part of the system — but if there is no language pack at all, mailniño says so instead of returning nothing. Add one in Windows Settings → Time & language → Language & region.
On Linux the reading is done by Tesseract. The .deb package installs it for you; with the AppImage, or when it's missing, mailniño writes out the command to install it once you click.
Links inside a PDF
Invoices and contracts in PDF often carry links — a Pay button, say. Clicking such a link in the attachment preview opens the page in your browser; mailniño stays where it was.
- Only full addresses open — the ones starting with
https://orhttp://. If the document only has a bare domain (mydomain.com), the click does nothing. - E-mail links (
mailto:) do not open from a PDF.
Reading a message and zoom
A click opens the message in the preview beside the list, a double click opens it across the whole app, and the control in the corner detaches it into its own window. In all three you get Reply, Reply all and Forward; Escape takes you back to the preview.
Small text in an e-mail can be enlarged three ways:
- Ctrl and the mouse wheel over the message,
- Ctrl and + / − (the numeric keypad works too),
- right-click in the message → Message size.
Ctrl and 0 goes back to the original size. Only the mail content grows — the message list and the panels stay as they are, and the setting is remembered.
You decide when a message counts as read. In Settings → Mail choose how long it has to stay open: from Straight away to 10 s. The delay stops arrow-key browsing from marking a whole folder read.
Printing and the message source are in the right-click menu over a message:
- Print — you get a tidy sheet with a header (From / To / Subject / date) and the message body, not the app window with its panels. If the message has attachments, you can print an attachment on its own.
- Show message source — the headers exactly as they sit on the server. You can switch between Headers only and Whole message and copy it; handy when you need to prove where a message travelled and who really sent it.
Find in message is also in the right-click menu (or under ⋯) above the message — it opens the text search bar, just like Ctrl+F.
Where a link really goes
Hover over a link in a message and a bubble in the bottom left shows the address it really goes to. The domain is in bold — that’s where you’ll end up. It works in the preview, in a message opened across the whole app, in its own window and in event details in the calendar.
Anti-phishing aid – a warning about a potentially fraudulent link. The bubble adds an orange “Warning: …” line, and when you click, mailniño asks first (Don’t open / Open — Enter opens nothing) when:
- the link text shows an address on a different domain from the one the link goes to (text
www.bank.com, link toother-site.com), - there’s a name with an @ in front of the domain —
https://www.bank.com@other-site.comgoes to other-site.com, - the domain mixes Latin letters with another alphabet (say, a Cyrillic “а” instead of “a”),
- the address has a number instead of a name (
http://185.23.44.1/…).
Nothing leaves your computer. Links are checked right on your PC; no outside service sees them. Ordinary links (“Click here”, click counters on the sender’s own domain) get no warning.
The mark on a message
Every row has a mark next to the date. Clicking cycles through: none → important → done → none.
How it is drawn is up to you: Settings → Appearance → “How to draw important” offers a star (like Gmail) or a flag (like Outlook). That part is only the look — on the server it is the same flag, so another program shows its own shape.
“Done”, however, is a real state. It is stored exactly the way Outlook marks a completed message, so what you click here shows up there too — and the other way round.
Translating a foreign message
When a message arrives in a language other than the one mailniño is running in, a bar appears above it offering a translation. The translating happens on your computer — the message text never leaves it.
- Open the message. Above it you will see Message language: German.
- Click Translate. The translation replaces the original; you can go back with Show original.
- The message keeps its formatting — colours, images and layout. Only the text is translated; the markup goes back where it belongs. With a message whose markup is broken it may not work out, and then you get the translated text.
- The first time you use a given language you get Download language and translate instead — a language model (about 20 MB) is downloaded once. Nothing is downloaded without your click.
Always from this sender makes messages from that address translate right away. You can undo it in the same place or in Settings → Translation.
Two levels of translation
The built-in translator is always there and it is fast — but it is a simple machine translation. It is enough to tell you what the message is about; do not pass its wording on. It also only handles direct pairs, which in practice mostly means translating from English.
Ollama with a translation model is a different level: it writes far better and handles pairs the built-in translator has no model for — German into Czech, for example. But it is a program you have to install yourself (see below).
Always check numbers, dates and amounts against the original. Whoever does the translating, it is a machine — and with a message you pay or plan by, a glance at the original takes a second.
Better translation through Ollama (optional)
- Install Ollama. On Windows the simplest way is
winget install Ollama.Ollama, otherwise get it fromollama.com. - Download a translation model:
ollama pull translategemma:4b(3.3 GB). - In mailniño open Settings → Translation and turn on Let mailniño use the Ollama I have on this computer.
- Done. From then on it does the translating, and the bar above the message shows whose work it is.
The model runs on the graphics card if the computer has one, otherwise on the processor. It takes about 3 GB of memory, but only while it is translating.
Until you allow Ollama, mailniño does not even ask it — it is someone else's program and the app does not knock on it by itself. That is why the bar above a message offers Download language and translate even when you already have a translation model on the machine. Allow it and the offer becomes a plain Translate, with nothing to download.
How much space it takes
Settings → Translation lists the downloaded languages with their size and a cross next to each. Deleting one breaks nothing — if you need that language again, it downloads again. The folder where the languages live is shown there too, along with the switch for the whole feature.
When you uninstall mailniño, the uninstaller offers a Delete application data option. It is not ticked, so by default the data STAYS on disk — downloaded languages included, in the same folder as your accounts and downloaded mail. Tick it yourself and all of it goes. Install mailniño again later and the downloaded languages are used straight away — nothing is downloaded twice.
Writing a message in another language
While you are writing, the bar above the body has a Translate button. Pick a language, mailniño translates the message and shows it to you for approval — you can edit it, and only Use it makes it your text.
- Only what you have just written gets translated. The quoted history stays as it is — it is already in the recipient's language. The account signature is not translated at all.
- The subject is translated too; if it fits, the original goes next to it in square brackets.
- The original wording is attached below the message until you turn that off, so the recipient can see what was meant.
- It works only with plain text and only with a translation model in Ollama — the built-in translator is not enough for text that goes out in your name.
Before you send it, go through the numbers, dates and amounts. The message goes out in your name and the recipient will not see the original, so they have nothing to check it against.
Writing a message: link preview and signature
When you put a link into a message you are writing, a quiet strip appears under the editor — “Add link preview” — with the domain it would reach out to beside it. One click turns the link into a card: picture, title, description and domain, all of it a link. The cross silences the offer for that link.
It offers, it never reaches out by itself. Loading a preview is the only place where mailniño calls a foreign server on its own — which is why it never happens automatically. An automatic preview would tell the other side that you put their link into a message, even if you never sent it. The picture goes into the message itself, so the recipient sees it even with remote images blocked.
Your signature doesn't repeat itself in a conversation. When it is already in the thread, mailniño offers to switch it off for the rest of the conversation. Offers — it does not switch it off for you; and the choice is remembered for that thread, so it holds after you close the app.
Blind carbon copy (Bcc)
At the end of the Cc row there is a “+ Bcc” button. Click it and a third address row appears. Anyone you put there receives the message, but the other recipients never learn about them — the delivered message carries no trace.
- The row is hidden by default so the compose window stays short.
- The copy saved to Sent does include the hidden addresses, so you can look up later who actually got the message.
- A saved draft remembers the hidden addresses.
- Replies and forwards never inherit a blind copy.
Moving around the compose window with the keyboard
Tab goes round the whole compose window: To → Cc → Subject → Priority → Format → formatting bar → message text → signature → Send → Send later → emoji → Attach → Save draft → Cancel → the buttons in the window header, and back to To. Shift+Tab goes the other way. If you Tab into the text and don’t type anything, the next Tab moves on; once you type, Tab indents.
Send from another account
When you have more than one account in mailniño, the compose window has a From row at the top. Pick which account the message goes out from — the signature swaps with it. When a message arrived at the address of another of your accounts (say, work mail forwarded into Gmail), your reply goes out from that account directly. The copy is saved to the Sent folder of the account the message went out from.
Unified inbox
All mail at the top of the folder pane shows mail from every account in one list; under each message, in small type, it says which account it is from (and which folder, when it did not arrive in the inbox). By default it merges the inbox of each account — you can add other folders in the folder pane.
Where the app starts is up to you in Settings → After launch: where you left off (the default), always All mail, or the Inbox of the default account.
Find a folder
When an account has more than 20 folders, a Find a folder… box appears above the folder list. Just type part of the name — case and accents don't matter. A match also shows its parent folder, and a tooltip on hover reveals the full path. Enter or a click opens the folder and expands the tree to it, Escape clears the search. The same search works in the Move to… menu too.
Labels
A label is stored in the message on the server, so your webmail and Thunderbird show it too, and it survives a reinstall.
- Create a label in Settings → Labels (name and colour).
- Right-click a message → Label to add it.
- Click the label itself on a message to take it off.
Used tags in another mail program? In Settings → Labels click Find labels already in my mailbox and mailniño adopts them.
The address book fills itself
You don't have to create contacts. mailniño remembers addresses by itself as soon as you deal with them:
- the sender of a message you open,
- the recipient of a message you send.
While writing, addresses are then suggested — start typing a name or address and mailniño offers what it knows. Once it learns a name for an address, it keeps the version with the name.
The whole address book is behind the card icon in the top bar. You can
edit it and import or export vCard (.vcf),
so contacts move in and out of other programs.
The address book stays on your computer — it syncs nowhere and nobody else sees it. Same principle as the rest of the app.
Maybe the same person. When the address book has two contacts with the same first and last name (say, someone writes from work and from home) or the same address, it offers Merge at the top — the details go into one contact and nothing gets overwritten — or Keep separate, and that pair won’t be offered again.
Sorting rules
Mail from a given sender (or a whole domain) can drop straight into a folder. Set it up in Settings → Mail → Sorting rules.
And mailniño offers it by itself. When it notices you keep moving the same mail into the same folder, it asks after the third move whether it should do that for you. Not sooner — asking after the first move would just be annoying.
Rules apply to incoming mail: they are there to sort what arrives. They do not reshuffle an old folder retrospectively — that is a different job, and a hard one to undo.
Blocking a sender
Block a nuisance address or a whole domain in
Settings → Privacy. Whether you type an at-sign tells mailniño if you
mean an address (who@company.com) or a domain (company.com).
Blocking cleans up the inbox of every account straight away, and whatever arrives later goes aside automatically. Messages already sitting in other folders stay where they are.
Snooze and send later
Snoozing a message (right-click → Snooze) hides it and brings it back as unread at the time you choose. It is moved on the server, so the snooze applies on your phone too.
Send later is under the clock button in the compose window. Scheduled messages live in their own folder and can be cancelled — cancelling saves the message as a draft rather than throwing it away.
To have scheduled mail go out with mailniño closed, switch on background sending in Settings → Mail. The computer does have to be on — no program sends anything from a machine that is switched off.
If a message can’t go out because of the connection, it isn’t lost: it waits in the orange Outbox folder and goes out on its own once the connection is back. Only what the server certainly didn’t take is sent again — if the connection drops in the middle of sending, mailniño tells you the message may have gone out and doesn’t send it again on its own, so it won’t arrive twice; the message stays where it was. For such a message in the Outbox, Send now asks first whether to really send it again. The folder only shows while something is waiting.
Calendar and invitations
There is a calendar button in the top bar — it switches the window from mail to the calendar and back again. You can switch between month and week. The data stays on your computer, just like your mail; no other service is contacted.
When someone sends you an invitation:
- It arrives as an ordinary message. A strip appears above it with When, Where, Invited by and People.
- The strip has three buttons: Accept · Maybe · Decline. Your answer goes to the organiser by e-mail.
- The meeting is written into the calendar only once the reply has actually been sent — otherwise you would have a meeting the organiser knows nothing about.
Your answer stays visible after you close the app and on any computer you move mailniño to — it is kept in the database, not in the browser.
Your own meeting: in the calendar click + New event.
- Invite — names are suggested from the same address book as message recipients. Guests get an invitation by e-mail.
- Create a call link — puts a Jitsi Meet link into the location field. No account, no signing in; guests get it right in the invitation.
- Remind me — a system notification pops up. ⚠️ Only while mailniño is running; on a switched-off computer it has nobody to pop up for.
- Repeat — daily, weekly, monthly, yearly, every n-th, and until when.
Editing a meeting keeps it the same meeting, not a new one — guests get an update. With a repeating event mailniño asks whether to remove just this one or the whole series. If you delete a meeting that has guests, a cancellation goes out to them — only that takes it out of their calendars.
Emoji reactions
When “got it” is all you want to say, click an emoji in the bar under the message header. You then have five seconds to undo it — only after that does the reaction go out.
It follows RFC 9078, so people using Gmail or Apple Mail see a reaction. Anyone whose program doesn't know it gets a short reply with the emoji in it.
When someone reacts to you, mailniño says so and offers a Show button that opens the message. The emoji then stays visible in the list row and under the message itself. A reaction to a mail you sent belongs to a message in your Sent folder — which is what the button is for.
Czech data boxes
mailniño can read and send messages in the Czech statutory “datová schránka” system. You connect a box in Settings → Accounts.
Checking is manual on purpose. In that system a message counts as delivered the moment you log in — and legal deadlines start running. Automatic background checking would start them behind your back.
Sending is charged unless you are writing to a public authority. mailniño tells you the price, and that it cannot be taken back, before you send.
Digital signing (S/MIME)
- Settings → Accounts → Edit → Digital signature.
- Choose where the key comes from: the Windows store (required for smart cards and qualified certificates) or a .pfx file.
- Use Test signature. With a card, Windows asks for the PIN there.
If signing fails, the message is not sent unsigned — the app stops and tells you why.
Saving and backup
One message: right-click → Save to disk — either
.eml (the whole message including attachments) or PDF
(the printed look, without attachments).
A whole mailbox: Settings → Backup — either a tree of
.eml files, or one .mbox per folder (Thunderbird reads that).
Everything is packed into a .zip; a large backup is split into parts.
Progress is visible and can be stopped.
Move to another computer
New machine, or a fresh Windows install? Take your setup with you: accounts with their passwords, sorting rules, labels, blocked senders, the address book, the calendar, connected data boxes, language and appearance. Mail itself is not included — that is what backup is for.
On the old computer
- Settings → Backup → Move to another computer.
- Make up a password for the file — without one, nothing is saved. Account passwords always go along and the file is encrypted with it. Signing certificates are taken only if you tick them.
- Save settings to a file and pick where. You get a single
.mninofile — kilobytes, so it fits anywhere.
On the new computer
- Install mailniño and go to Settings → Backup → Move to another computer.
- Load settings from a file and pick that
.mninofile. - A preview appears: what is in the file and which accounts are already here. Nothing has changed yet.
- For a password-protected file, type the password and hit Load it in.
Loading adds, it never overwrites. An account that already exists on the new computer stays as it is — it is replaced only if you ask for it by ticking Overwrite accounts that are already here. Loading the same file twice is harmless.
Remember the file password. The file is encrypted with it, there is no way to recover it, and without it the settings will not load.
Accounts signed in with Microsoft move across together with the sign-in.
A signing certificate from a .pfx file moves across with its password. A
certificate from the Windows certificate store cannot travel in the file —
set up signing again when editing the account on the new computer.
What is not included: downloaded mail (downloaded data box messages included) and AI access — that stays on the computer where it was granted. Downloaded translation languages stay behind too; the new computer fetches them with one click.
AI over MCP
mailniño has no chatbot of its own. It can, however, expose its functions to an AI client you run yourself — Claude Desktop, for example.
Claude Desktop — the simplest way
Claude is an ordinary app and you can download it free at claude.ai/download.
- In mailniño open Settings → AI and click Connect Claude Desktop. mailniño writes itself into Claude's settings with the right paths — you type nothing by hand.
- Quit Claude completely and start it again (including the icon by the clock). Without that, nothing happens.
- A request with a verification code appears in mailniño. Check that the code matches what Claude shows and click Allow.
The other option: the .mcpb bundle — open it in Claude and
it sets the connection up on its own. Claude brings its own Node, so there is nothing
else to install.
Claude Code or another AI in a terminal
Settings → AI has a Copy command button. Paste it into a terminal and run it — the right paths and data folder are already in it.
GitHub Copilot (for developers)
- In Settings → AI click Connect GitHub Copilot. mailniño writes itself wherever it finds Copilot: VS Code, VS Code Insiders, Visual Studio and Copilot in a terminal.
- Close your editor and start it again.
- In Copilot switch the chat to Agent and turn mailniño on among the tools. The request with a code follows.
The Copilot that comes with Windows 11 can't be connected this way. Microsoft is still building its agent registry and it is only in preview builds of Windows so far.
ChatGPT
ChatGPT talks to tools over the network, so it can't reach a program on your computer directly. Either through OpenAI's Secure MCP Tunnel (it needs an account at platform.openai.com and an API key — work for the advanced), or wait until mailniño offers a connection through its own server.
Another AI — manual setup
Settings → AI has a section with the exact paths to the command and the argument. Copy them into your AI's settings and start it; the rest is the same — request, code, Allow.
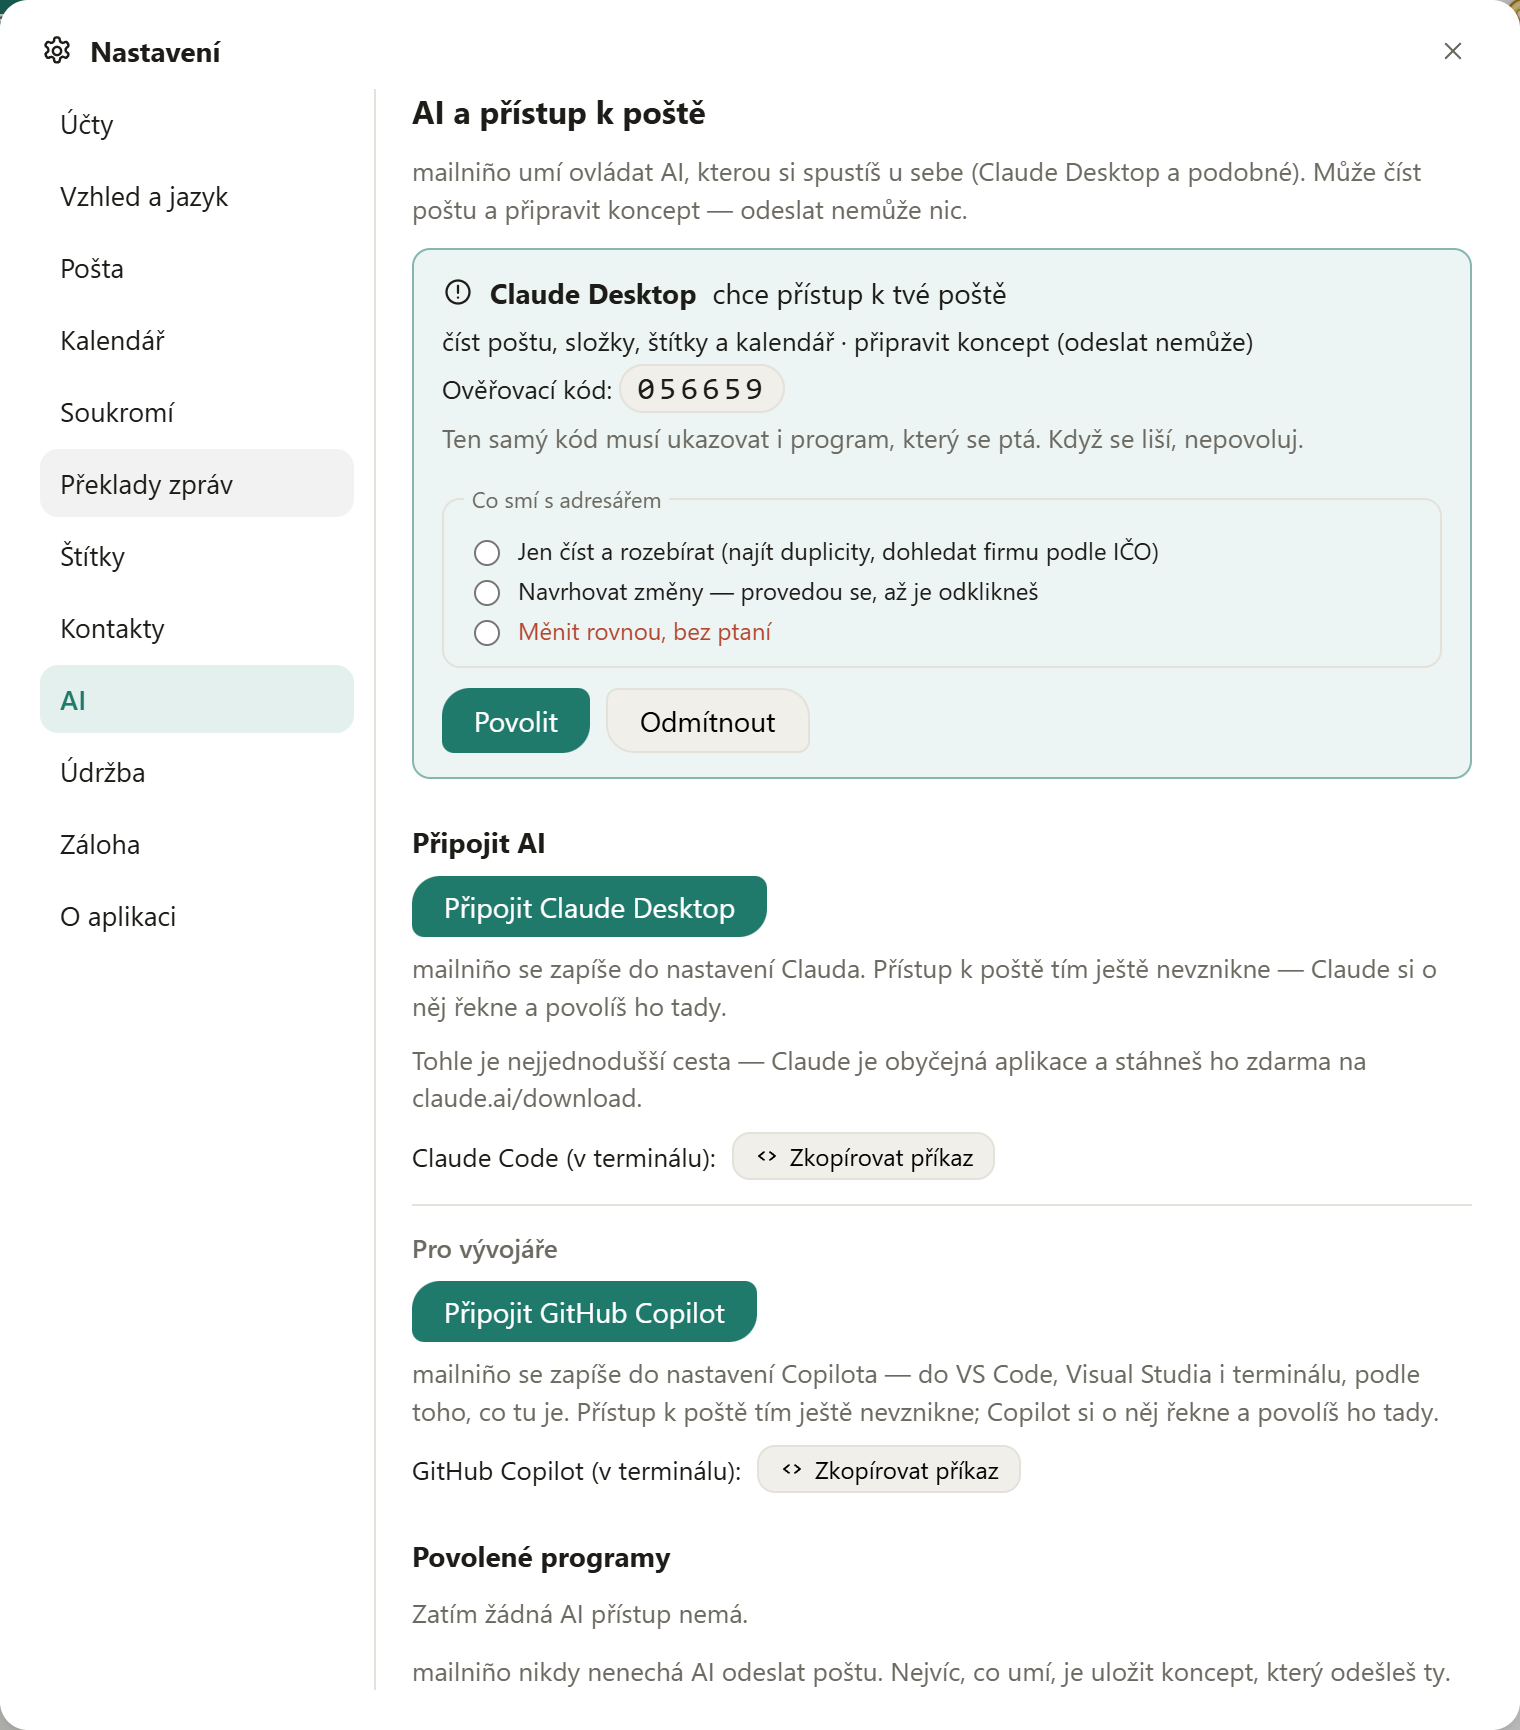
An AI cannot send mail. It can read and prepare a draft — sending is yours to do. Access can be limited to a single account and revoked whenever you like; revoking takes effect immediately.
The same principle applies to translating messages: the clever thing is yours, mailniño only hands it your mail.
Maintenance: speeding mailniño up
The more mail goes through, the bigger the file in which mailniño keeps its copy of the mailbox — and the slower opening messages gets. In Settings → Maintenance you can bring it back into shape. First you see what takes how much, then two buttons:
- Speed up — the file is compacted and the search index tidied. Nothing is deleted. On a large mailbox it takes a while and needs free disk space the size of that file.
- Free up space — drops stored copies of messages older than you choose (3 months, 6 months, a year).
⛔ Your mail is not deleted by this. Only the copies mailniño keeps are dropped — the original stays in your mailbox. The message stays in the list, you can still find it by content, and it is fetched from the server when opened. The only difference: without a connection you will not see it until you open it once.
The same tab holds automatic deletion in Trash and Junk — the only place where mailniño deletes mail on its own, and only where deleting is the point of the folder.
Where to switch it on: right-click Trash or Junk and pick Automatic cleanup… — the periods 30 · 90 · 180 · 365 days and Off are right there. The same can be set in Settings → Maintenance. mailniño asks before switching it on, and once it is on, the menu shows the period as well.
⛔ Over any other folder the option does not appear at all. Deleting on its own is allowed only where deleting is the point of the folder — in your Inbox or Archive mailniño never removes anything. Age is counted from when the message arrived.
The log: when something breaks
mailniño writes down what it does while it runs. When something misbehaves, the log shows where it got stuck — it is the most useful thing you can attach to a bug report. It holds no message content and no passwords.
- Open Settings → About and scroll down.
- Click Open the log — it opens in Notepad.
- Copy the last few dozen lines (what matters is always at the end) and send them to us.
It works even when mailniño does not. If you get the screen saying the mail service is not answering yet, the Open the log button is right there, under “Try again” — which is exactly when the log matters most.
Common trouble
The server refused the login
With Gmail it is almost always a missing app password (see above). Otherwise check that you are using your full address as the username.
The server's certificate can't be trusted
The server presented a certificate issued for a different name. This typically happens
with your own domain — use the provider's server (for example imap.seznam.cz),
not imap.yourdomain.com.
Images in a message don't show
That is deliberate: they are blocked so the sender cannot tell you opened the message. There is a bar above the message that lets them through, either once or permanently for that sender.
No translation was offered for a marketing message
Marketing mail often carries its whole content in images — the only text left for language detection is the footer. mailniño therefore also looks at the subject. When even that gives nothing away, no translation is offered: guessing would mean saying “translate into English” over a message that is in English already, and that is worse than staying quiet.
Search doesn't find an older message
The text inside messages is kept only for the newer ones, to save disk space. You can raise the limit in Settings → Mail.
There is a notice where an image should be
That means the sender links to an image that isn't anywhere — typically a link to their own disk, or an attachment missing from the message. No mail program can show such an image; the notice is there so you don't have to wonder whether the fault is yours. For remote images that simply were not loaded there is no notice — those have the bar above the message.
It will not find the invoice in the attachment
Attachments are read after message texts, so on a large mailbox it takes a while. Check as well that Settings → Mail → “Search inside attachments too” is on. If it is a scan (a photographed or scanned sheet), there is no text in it and it can only be found by file name — mailniño cannot read from a picture yet.